最近自刀了一个深港 IPLC(吃不起饭啦),分有深圳端和香港端两公网 IP 和两内网 IP,内网走的是 IPLC。如果只用 NAT / Port Forwarding 的话未免也太逊了点,对不起我这个钱啊(不x)!于是就尝试通过一些奇妙的操作想把它们 “串” 起来,然而过程可想而知并不是那么的顺利……(
-
目录
- NAT / Port Forwarding with iptables
这里是对 NAT 的基础讲解,比较简单(
NAT, or Network Address Translation, which is one of the most basic ways allowing a gateway to forward packets, enables LAN (Local Area Network) users to access WAN (Wide Area Network) normally.
OSI model (Open Systems Interconnection model) includes 7 layers labelled from 1 to 7: Physical, Data link, Network, Transport, Session, Presentation, Application. NAT works in Layer 3 “Network”, where also the ordinary routing tables take effect. The packet transmitted in this layer are called IP Packet, which is composed of a IP Header and data inside, such as TCP, UDP, ICMP, OSPF and some other IP protocols, which represents Layer 4 “Transport”.
A IP Header consists of TTL (Time to Live), Protocol numbers, Source IP Address, Destination IP Address and many other important messages, therefore that’s the reason why NAT relies on it.
Now let’s have a detailed look at how exactly NAT works.
Assuming that you are a LAN user with an internal IP 192.168.1.2, and the router, or gateway, is at 192.168.1.1. When accessing, for example, 1.1.1.1, the system constructs a packet with all necessary messages including the Destination IP 1.1.1.1 and the Source IP 192.168.1.2, and then send it to the directly connected gateway at 192.168.1.1. What if the gateway only transmit the packet without any modifications? Putting aside the filters of IP spoofing, assuming that the packet eventually arrive at the target, safe. Then the target will “exchange” the packet’s Source IP with Destination IP, getting ready to send back its response. But, how is it able to send to 192.168.1.2 in WAN? There may be millions of “192.168.1.2” available, and in fact, the target have no route to this private IP address. So you will never get any response from the target, because the target doesn’t know how to send it back to you. All of this is due to your private network in LAN, and the gateway just transmit the packet without modifications.
So here comes the NAT! Commonly, NAT modifies the Source IP Address in a IP Packet. For instance, when your gateway happens to have a well-routed public IP address and you’re sending packets to it via the LAN subnet, the gateway changes the packet’s Source IP Address (from 192.168.1.2 to its public IP address) and then forward it to the WAN. In this situation, the target knows how to reply since the Source IP Address (for it it’s the Destination IP Address) is now reachable. Once the gateway receives the response, it will be matched with the marks in the kernel, then modifying the Destination IP Address (from its public IP address to 192.168.1.2), sending back to your system at 192.168.1.2.
This process is so called IP masquerading. It can be done using iptables with the following command:
|
1 |
sudo iptables -t nat -A POSTROUTING -o eth0 -j MASQUERADE |
“nat” is the table name, “POSTROUTING” is the chain name, “eth0” is the interface where this rule will have effect.
Meanwhile, port forwarding is almost the same. The gateway changes its Destination IP Address when a packet arrives at the certain port of the gateway. This can be done using iptables with the following commands:
|
1 2 |
sudo iptables -t nat -I PREROUTING -p tcp --dport 443 -j DNAT --to 1.1.1.1 sudo iptables -t nat -I POSTROUTING -p tcp --dport 443 -j MASQUERADE |
or
|
1 2 |
sudo iptables -t nat -A PREROUTING -p tcp --dport 443 -j DNAT --to-destination 1.1.1.1:443 sudo iptables -t nat -A POSTROUTING -p tcp -d 1.1.1.1 --dport 443 -j SNAT --to-source 1.2.3.4 |
which means forwarding packets from 192.168.1.1:443 to 1.1.1.1:443, SNAT and DNAT represents two types of modifications of Source IP Address and Destination IP Address respectively, 1.2.3.4 is your public IP address (maybe private if under more NATs).
* Yes here we’re talking about IPv4, not IPv6.
(至于为什么是全英文,因为我感觉半中文半英文太丑了啊(,虽然底下也是这样
- Installation and configuration of Wireguard
在 Ubuntu 18.04 amd64 上,Wireguard 可以通过几个简单的步骤安装。
如果没有 add-apt-repository 的话,可以先 sudo apt install software-properties-common
|
1 2 |
sudo add-apt-repository ppa:wireguard/wireguard sudo apt install wireguard wireguard-dkms |
如果 dkms 安装失败的话,可以尝试升级 kernel 或者重启()
然后 Wireguard 的基本配置也很简单:
1,Wireguard 为 Peer 型 VPN,因此每个 Peer 都要有它的 Public/Prvate Key,可以通过 wg genkey 及 wg pubkey 生成。
2,一对 Peer 间至少要有一方指定 Endpoint (挺显然吧www)
3,Wireguard 仅允许 AllowedIPs 里指定的 IP 通过它的 Interface,这为之后的手动 Routing 埋下了伏笔)
所以我们假定的 Server 端(Gateway 端):
|
1 2 3 4 5 6 7 8 9 10 |
[Interface] Address = 10.1.1.1/24 ListenPort = 12345 PrivateKey = xxxxxxxxxxxxxxxxxxxxxxxxxxxxxxxxxxxxxxxxxxxx PostUp = iptables -t nat -A POSTROUTING -o wg -j MASQUERADE PostDown = iptables -t nat -D POSTROUTING -o wg -j MASQUERADE [Peer] PublicKey = xxxxxxxxxxxxxxxxxxxxxxxxxxxxxxxxxxxxxxxxxxxx AllowedIPs = 10.1.1.2/32 |
其中 PostUp 和 PostDown 即在 Interface Brought Up 之后和 Taken Down 之后执行的命令,利用 MASQUERADE 进行 NAT 使得流量可以正常经过 Server 端并从另一个 Interface 出去。
Client 端:
|
1 2 3 4 5 6 7 8 9 |
[Interface] PrivateKey = xxxxxxxxxxxxxxxxxxxxxxxxxxxxxxxxxxxxxxxxxxxx Address = 10.1.1.2/32 ListenPort = 12345 [Peer] PublicKey = xxxxxxxxxxxxxxxxxxxxxxxxxxxxxxxxxxxxxxxxxxxx Endpoint = xx.xx.xx.xx:12345 AllowedIPs = 10.1.1.0/24 PersistentKeepalive = 25 |
然后使用 wg-quick up wg 启动放在 /etc/wireguard/wg.conf 里的配置, sudo systemctl enable wg-quick@wg 来开机启动,就完成了最基本的配置啦。
试试在 Client 上 ping 10.1.1.1 会发现通了,而且只有一跳,这样就可以把 Multi-hop 转换为 Direct 了。
- Route on your own
由于我们在 Client 端的 AllowedIPs 那里填入了 10.1.1.0/24 这个子网,所以若使用 ip route show 查看路由信息的话,会发现确实也只有 10.1.1.0/24 这个子网会通过 Wireguard 的 Interface 走到 Server 端。
然而,如果我们自己 sudo ip route add 1.1.1.1/32 dev wg 希望让 1.1.1.1/32 也通过 Server 端走出去的话,会发现竟然连 Gateway 10.1.1.1/32 都走不到?!这是 Wireguard 的一个特性:由于我们并没有在 AllowedIPs 里面加入 1.1.1.1/32,所以 Wireguard 自动把它当成 Invalid 过滤掉了!所以如果我们想自由地 Route,就必须把 Client 写成这样:
|
1 2 3 4 5 6 7 8 9 10 11 12 |
[Interface] PrivateKey = xxxxxxxxxxxxxxxxxxxxxxxxxxxxxxxxxxxxxxxxxxxx Address = 10.1.1.2/32 ListenPort = 12345 Table = off PostUp = ip route add 10.1.1.0/24 dev wg [Peer] PublicKey = xxxxxxxxxxxxxxxxxxxxxxxxxxxxxxxxxxxxxxxxxxxx Endpoint = xx.xx.xx.xx:12345 AllowedIPs = 0.0.0.0/0 PersistentKeepalive = 25 |
Table = off 就是不让 Wireguard (准确地来说是 wg-quick)自动添加路由,所以要在 PostUp 那里手动加进去,由于 Interface 删除时 Route 会自动消失,所以不用在 PostDown 里进行删除处理
开始手动 Route 了(笑,然后再 sudo ip route add 1.1.1.1/32 dev wg 并且尝试 mtr 1.1.1.1 ,就会发现真的从 Server 端走出去了!
- Chained Wireguard Network (Policy Routing)
那么现在的设想是,在深圳端上起一个 Server,用于连接国内客户端;并且在深圳端和香港端内网(走 IPLC)也起一个 Wireguard Tunnel 用于数据交换。那么该怎么把深圳端那里的流量全部 Forward 到香港端呢?
深圳端 Server wgs 网段 10.66.224.1/19,香港端 Server wgp 网段 10.66.220.200/24,深圳端 Client 分配 10.66.220.1/32
由于我们连接到的是深圳端的 Server,所以从深圳端 wgs 里发送出去包的 Source IP Address 肯定属于 10.66.224.0/19。
所以这其实是一个 Source-based routing,即如果包的 Source IP Address 为 10.66.224.0/19,那么就把它 Route 到 wgp 上,否则按照默认的 Routing table 走。
那么首先我们创建一个自定义 Routing table:
|
1 |
sudo su -c 'echo 1 t-1-2 >> /etc/iproute2/rt_tables' |
然后再往里面加匹配规则:
|
1 |
sudo ip rule add from 10.66.224.0/19 lookup t-1-2 |
最后往里面加路由:
|
1 2 |
sudo ip route add 0.0.0.0/0 dev wgp table t-1-2 sudo ip route add 10.66.224.0/19 dev wgs table t-1-2 |
值得注意的是这里需要加两条路由,否则在访问 10.66.224.0/19 中的其他 Client 的时候就会被顺带一起 Forward 到香港端去,这不是我们想要的效果
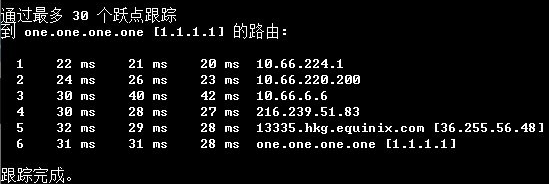
最后测测效果:
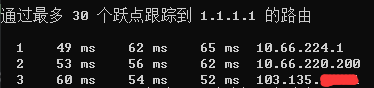
完美!可以看到流量顺利地从深圳端 Server 10.66.224.1 通过 IPLC 里起的内网隧道 流到了香港端 Server 10.66.220.200
同样地,继续在 GCP HK 上起一个 Server 10.66.6.6/24,并且分配给香港端 10.66.6.250/32,按照上面的方法,使得 Source IP Address 为 10.66.220.0/24 的包(因为从 wgp 里出来后经过了 NAT 处理,源 IP 被改变)全部走 wg6 到 10.66.6.6,从 GCP HK 里出去。
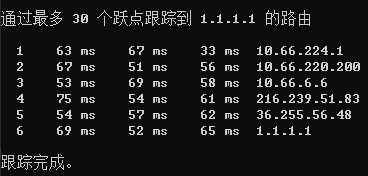
太完美了!
至此,我们已经成功地把三个 Wireguard 串起来了,作为参考,以下为完整的配置文件:
深圳端 Server wgs
|
1 2 3 4 5 6 7 8 |
[Interface] Address = 10.66.224.1/19 PostUp = ip route add 10.66.224.0/19 dev wgs table t-1-2 ListenPort = 12345 PrivateKey = xxxxxxxxxxxxxxxxxxxxxxxxxxxxxxxxxxxxxxxxxxxx [Peer] PublicKey = xxxxxxxxxxxxxxxxxxxxxxxxxxxxxxxxxxxxxxxxxxxx AllowedIPs = 10.66.224.2/32 |
深圳端 Client wgp
|
1 2 3 4 5 6 7 8 9 10 |
[Interface] Address = 10.66.220.1/32 PostUp = ip rule add from 10.66.224.0/19 lookup t-1-2; ip route add 0.0.0.0/0 dev wgp table t-1-2; iptables -t nat -A POSTROUTING -o wgp -j MASQUERADE PostDown = ip rule del from 10.66.224.0/19 lookup t-1-2; iptables -t nat -D POSTROUTING -o wgp -j MASQUERADE PrivateKey = xxxxxxxxxxxxxxxxxxxxxxxxxxxxxxxxxxxxxxxxxxxx Table = off [Peer] Endpoint = 10.xx.xx.xx:12345 PublicKey = xxxxxxxxxxxxxxxxxxxxxxxxxxxxxxxxxxxxxxxxxxxx AllowedIPs = 0.0.0.0/0 |
香港端 Server wgp
|
1 2 3 4 5 6 7 8 9 |
[Interface] Address = 10.66.220.200/24 PostUp = ip rule add from 10.66.220.0/24 lookup t-2-6; ip route add 10.66.220.0/24 dev wgp table t-2-6 PostDown = ip rule del from 10.66.220.0/24 lookup t-2-6 ListenPort = 12345 PrivateKey = xxxxxxxxxxxxxxxxxxxxxxxxxxxxxxxxxxxxxxxxxxxx [Peer] PublicKey = xxxxxxxxxxxxxxxxxxxxxxxxxxxxxxxxxxxxxxxxxxxx AllowedIPs = 10.66.220.1/32 |
注意到 同样地,这里添加了一个 10.66.220.0/24 的直连 Route,否则到 10.66.220.0/24 的流量就全部被 Forward 到 GCP HK 10.66.6.6 上,这不是我们想要的效果
香港端 Client wg6
|
1 2 3 4 5 6 7 8 9 10 11 12 |
[Interface] PrivateKey = xxxxxxxxxxxxxxxxxxxxxxxxxxxxxxxxxxxxxxxxxxxx Address = 10.66.6.250/32 ListenPort = 12345 PostUp = ip route add 10.66.6.0/24 dev wg6; ip route add 0.0.0.0/0 dev wg6 table t-2-6; iptables -t nat -A POSTROUTING -o wg6 -j MASQUERADE PostDown = iptables -t nat -D POSTROUTING -o wg6 -j MASQUERADE Table = off [Peer] PublicKey = xxxxxxxxxxxxxxxxxxxxxxxxxxxxxxxxxxxxxxxxxxxx Endpoint = GCP.HK:12345 AllowedIPs = 0.0.0.0/0 PersistentKeepalive = 25 |
GCP HK Server wg6
|
1 2 3 4 5 6 7 8 9 10 |
[Interface] Address = 10.66.6.6/24 PostUp = iptables -t nat -A POSTROUTING -o ens4 -j MASQUERADE PostDown = iptables -t nat -D POSTROUTING -o ens4 -j MASQUERADE ListenPort = 12345 PrivateKey = xxxxxxxxxxxxxxxxxxxxxxxxxxxxxxxxxxxxxxxxxxxx MTU = 1420 [Peer] PublicKey = xxxxxxxxxxxxxxxxxxxxxxxxxxxxxxxxxxxxxxxxxxxx AllowedIPs = 10.66.6.250/32 |
(值得注意的是 GCP Network Interface 的默认 MTU 都偏小,所以需要手动指定
- Selective Routing (Policy Routing 1)
现在我还有一台 HKT,也想把它加入这个 Wireguard Network。
然而这样就出现了一个问题:在香港端上,如何决定走 GCP HK 还是 HKT?
iBGP?动态?随机????
还是回到最原始的方法 Source-based routing
如果我们能在 Client wgs 上监听不同的 IP 地址,并且连到不同的出口,那就好了!
但是有一个问题:经过深圳端的 Client wgp 到达香港端 Server wgp 后,这个数据包是经过 NAT 的,也就是说,它丢失了我 Client wgs 连到深圳端 Server wgs 所带有的 Source IP Address 信息!
所以首先要把深圳端上的 Routing policy 做一些修改:不能直接一锅端到同一个 Routing table 里。因为我们想在传输的过程中保留一些原来 Source IP Address 的信息,而这些信息又会在 NAT 中被替换为自己的 Source IP Address,所以只需原来的 Source IP Address 一一对应 NAT 后的 Source IP Address,不就可以达到 Selective 的效果了吗?
所以在深圳端 Server wgs 上更改 AllowedIPs 为 10.66.224.2/32 和 10.66.225.2/32,前者走 GCP HK,后者走 HKT。
接着需要把这两分进不同的 Routing table 里
|
1 2 |
sudo ip rule add from 10.66.224.0/24 lookup t-1-6 sudo ip rule add from 10.66.225.0/24 lookup t-1-10 |
由于要使 NAT 后的 Source IP Address 仍带有我们的信息,因此直接把香港端 Server wgp 的 AllowedIPs 改为整个 10.66.220.0/24,并且在深圳端 Client wgp 同时监听 10.66.220.224 和 10.66.220.225。
值得注意的是,MASQUERADE 操作会自动选择适合的 Source IP Address 进行 NAT(在 ip route 里添加 src 关键字是无用的),这样就达不到我们想要的效果了,因此改为 SNAT 手动指定 Source IP Address
|
1 2 |
sudo iptables -t nat -A POSTROUTING -o wgp -s 10.66.224.0/24 -j SNAT --to-source 10.66.220.224 sudo iptables -t nat -A POSTROUTING -o wgp -s 10.66.225.0/24 -j SNAT --to-source 10.66.220.225 |
至此,已经成功的把从深圳端 Client wgp 发出去的包中 Source IP Address 标记好了。剩下要做的只是在香港端 Server wgp 进行分流即可。
|
1 2 |
sudo ip rule add from 10.66.220.224/32 lookup t-2-6 sudo ip rule add from 10.66.220.225/32 lookup t-2-10 |
之后的步骤如出一辙,部分关键 PostUp 和 PostDown 语句附在下方
深圳端 Server wgs
|
1 2 3 4 5 6 7 8 9 10 11 |
#!/bin/bash postup() { ip route add 10.66.224.0/19 dev wgs table t-1-6 ip route add 10.66.224.0/19 dev wgs table t-1-10 } postdown() { } |
深圳端 Client wgp
|
1 2 3 4 5 6 7 8 9 10 11 12 13 14 15 16 17 18 19 |
#!/bin/bash postup() { iptables -t nat -A POSTROUTING -o wgp -s 10.66.224.0/24 -j SNAT --to-source 10.66.220.224 iptables -t nat -A POSTROUTING -o wgp -s 10.66.225.0/24 -j SNAT --to-source 10.66.220.225 ip rule add from 10.66.224.0/24 lookup t-1-6 ip rule add from 10.66.225.0/24 lookup t-1-10 ip route add 10.66.220.0/24 dev wgp ip route add 0.0.0.0/0 dev wgp table t-1-6 ip route add 0.0.0.0/0 dev wgp table t-1-10 } postdown() { iptables -t nat -D POSTROUTING -o wgp -s 10.66.224.0/24 -j SNAT --to-source 10.66.220.224 iptables -t nat -D POSTROUTING -o wgp -s 10.66.225.0/24 -j SNAT --to-source 10.66.220.225 ip rule del from 10.66.224.0/24 lookup t-1-6 ip rule del from 10.66.225.0/24 lookup t-1-10 } |
香港端 Server wgp
|
1 2 3 4 5 6 7 8 9 10 11 12 13 14 |
#!/bin/bash postup() { ip rule add from 10.66.220.224/32 lookup t-2-6 ip rule add from 10.66.220.225/32 lookup t-2-10 ip route add 10.66.220.0/24 dev wgp table t-2-6 ip route add 10.66.220.0/24 dev wgp table t-2-10 } postdown() { ip rule del from 10.66.220.224/32 lookup t-2-6 ip rule del from 10.66.220.225/32 lookup t-2-10 } |
香港端 Client wg6
|
1 2 3 4 5 6 7 8 9 10 11 12 |
#!/bin/bash postup() { ip route add 10.66.6.0/24 dev wg6 iptables -t nat -A POSTROUTING -o wg6 -j MASQUERADE ip route add 0.0.0.0/0 dev wg6 table t-2-6 } postdown() { iptables -t nat -D POSTROUTING -o wg6 -j MASQUERADE } |
- 最后
UDP 的 QoS 等级多低我也清楚,所以我自己平常都用的 TCP 而不是走 组好的 Wireguard Network 来番茄
那组这个 Wireguard Network 到底有啥用呢…………………………………
而且wtm作业不是还没写完吗,正值nmd高考之际
啊,可能就是组着开心吧
深港 3.4ms,倾家荡产